Wednesday, December 15, 2010

Teacher or Coworker Gifts

 It's not too late to make this quick handmade gift for the wonderful teachers in your child's life or the coworkers that make your day-to-day a little easier.  I hope personalized coffee cup sleeves, a handwritten note, and a Starbucks gift card where on Elle's teachers wish list this year :)

All you need to get started is some fusable fleece, a pretty print, a button, a hair tie, and one of those cardboard coffee cup sleeves from your neighborhood Starbucks (just the thought of someone reading this blog not having a neighborhood Starbucks makes me shutter!  What ever would I do?!?!).
Okay so once you've gathered your supplies, just un-stick the cardboard sleeve so you can use it as a template to cut the print and fusable fleece.  Fuse the fleece and print fabric together and top stitch all the way around, catching the hair tie at one end (I back stitched over the hair tie just to make sure it was secure). Fit the sleeve around a coffee cup and mark the placement for a button.  Sew your button on and embroider an initial if you'd like.


When I bought the Starbucks gift cards I asked them for iced coffee tall cups.  I put the gift card & a little tag with a note in the cup and put the sleeve on the cup.


Photobucket 


This post was linked to on:
Fresh Poppy Design

Tuesday, December 7, 2010

Atomic Holiday Bazaar

 
Oh you lucky lucky Floridians, Atomic is coming!  Atomic Holiday Bazaar is the best thing going for unique handmade goodness and it's this weekend in Sarasota!  I'll be at the Saturday day show, so come by to say hello and pick up an Elle Belle sling (I'm debuting new embroidery designs!) for the new Mommy or Mommy-to-be on your Christmas list!  If you let me know you follow my blog and can tell me what my last post was about I'll have a sweet treat for you. 
 
There'll be so many amazing crafters and artists at the show... I'm looking forward to seeing some of my favorites from our local crowd:
 
I'm thinking pocket peeper stockings are on my girl's Christmas list's this year!
 

The Crafty Hag's mini notes would be the perfect addition to gifts this year!


I always drool over the Sew It's For You sushi embroidery designs!


Boogie Bead has so much more than just beads... you can check out her Boogie Baby goodies at Atomic!


You'll find great stuff even for the guys on your list, like Patrick's amazing wooden pens!
Don't miss Atomic, it's the best place to finish up your Christmas shopping!
Photobucket

Thursday, December 2, 2010

Fruit Sushi


The parents at Elle's school take turns bringing in snacks for the kids for the week.  So a couple times during the school year, we have to come up with a little snack to pack for 18 kids.  This week was Elle's first snack week.  

I thought it would be fun to make our snacks sort of interactive/hands on... that is the Montessori way after all.  We did a couple simple things like applesauce with a few toppings to choose from and ants on a log (celery with almond butter... sheesh what's up with kids and peanut alergies?!?... and raisens) but we ended the week with Elle's favorite - SUSHI!  Let me just take this second to say how happy it makes me that Elle loves sushi as much as I do.  

Okay so, clearly I could not send "real" sushi to school for Elle's classmates... I think the teachers already have an idea about how crazy I am, but that would erase any doubt!  We opted for fruit sushi.  I saw this idea on a bento blog and I would love to give credit to the genius Mom who thought of this... if it was you, please speak up.    

A marshmallow "rice", with a mandarin orange "shrimp" on top, wrapped in fruit leather "seaweed" (I shop the health food section at Sweet Bay to get all natural made from fruit puree fruit leather) has got to be the cutest snack ever.  Dontcha think?!  
Photobucket 
This post linked to on:

Wednesday, November 17, 2010

It's Christmas Card Time!

Have you gotten your Christmas cards together yet?  Your family and friends want to stick your happy face to their refrigerator... it's time to order your Christmas cards! 


The very talented Erin of Foosie Design made ours this year.  I LOVE her simple understated style and I'm super excited about the postcard format!  I always appreciate when a friend takes the time to write a little personal note on their cards & a postcard is the perfect way to say something sweet without having to drone on about your entire year just to fill the space.  Not only will your card stand out from the sea of same 'ol same 'ol Christmas cards, but you'll also save money by not having to spring for the envelopes and paying a little less in postage!


I'm really happy with the cards we picked this year but it was a tough decision!  Check out these other cards that were in the running:


How seriously cute is this snowglobe card by Trinity St Studio?!  If you have a full length picture of you and yours standing, this fun card could be the one!


 If you had a really awesome & exciting year this year, Shutterfly's top ten moments card is a great way to share!

 
For me, Christmas cards are the signal that the holiday season is upon us... let the games begin!


Photobucket

Friday, November 5, 2010

Red & the Wolf

I lied... Ginger's Halloween Birthday party wasn't the last of the Halloweenyness here on my blog... this is,  my kiddos' Halloween costumes.  Elle was Little Red Riding Hood and Liv was the big bad wolf... or the little good wolf depending on who you ask.


I used McCall's Pattern 6187 to make Red's hood.  I was deciding whether I wanted to use the rest of the pattern to make the dress... I hate sewing clothes from a commercial pattern, they NEVER come out the size you think they should... so I came up with an idea I think I'm gonna use every year from now on.  I made the "dress" part of the costume as an apron and Elle wore it over a simple white t-shirt and white tutu.  Two sweet braids tied with red satin ribbon, black mary janes, and a little picnic basket with a bit of left over red gingham finished the costume.

Liv's costume was more of a craft than a sewing project.  I just picked up some "furry" fabric, sewed it into a long tube and cut it into 3 parts, one for the tail and two for cuffs.  I sewed the tail to a loop of elastic that she wore around her waist & sewed a bit of elastic into each of the short tubes so she could wear them as cuffs around her wrists.  I picked the ears up at a costume store... they were kitty ears on hair clips that I hot-glued the fur fabric to and sewed little ribbon loops on her hoodie to clip the ears to.  I also sewed a bigger tube of the "fur" fabric and hot glued it to the sole of a pair of cheap tennis shoes she was about to grow out of.  Daddy finished the costume up by drawing a little black nose and a few wiskers.
All night everyone told Elle how cute her little brother looked... I think next year Liv will have to be something other than Elle's prop.

 
Photobucket

Wednesday, November 3, 2010

Halloween + Birthday = This Awesome Party!


I love planning holiday parties because everywhere you go there's inspiration for your theme and party supplies galore! I worked with Dawn (my fabulous photographer!) on this awesome Halloween birthday party for her 4 year old, Ginger. We combined lots of fun Halloween goodies with even more creative ideas.


There were so many fun elements and special details to this party, but this is my blog, so we're gonna start with the make-your-own caramel apple bar I put together ;) There were 4 "stations" on the table... first the kids picked an apple from the stand, then I helped them dip it in the caramel (super easy recipe for crock pot caramel here... just be sure to watch it when it gets near the end & stir as necessary), then they chose one of four toppings to roll their apple in: crushed peanuts, heath bar bits, sprinkles, & mini chocolate chips, lastly we put it on wax paper to dry. Once they were dry we placed them in Halloweeny cello bags and the kids got to take them home. It was fun & entertaining for the kids and doubled as a yummy take home treat!


Putting the table together was so easy using the Halloween Glam printables collection from Tom Kat Studio! I just used double sided tape to attach the flags to the apple sticks and a little spider web stretched over some candle sticks trapped the "dip" "roll" & "dry" signs. The candle sticks held funkins I picked up at Michaels and spray painted spooky black. The hall where the party was held had historic photos and memorabilia on the walls that we couldn't take down or really alter... so adding some spider webs and spiders provided a fun backdrop that fit the theme.


Check out this amazing dessert table! There were so many treats to choose from - sugar rolled marshmallows, chocolate dipped pretzel "witch wands", chocolate covered jack-o-lantern Oreos, cupcakes with adorable Ginger in a witch hat cupcake picks, chocolate dipped rice crispy treats, & a cutesy ghost sucker tree. A stone head with black glittery twigs and ominous crows pulled it all together.


Can't forget the poison! Water bottle labels are so easy and a really fun detail. Dawn took them to the next level with these bigger labels for the bottles of soda! And while we're at it, I may as well mention that no guests' taste was left uncatored to... there was salsa, fresh guacamole & chips, Sangria, beer, jello shots, cookies & pizza from a tasty local shop.


The hall was decorated with so much Halloween fun! Ghosts that flew across the ceiling, rats that raced along the floor, spider webs, candelabras, & steaming caldrons. The table that greeted you at the front of the hall was the centerpiece. Bedecked in cheesecloth, it showcased beautiful photos of the birthday girl (the handiwork of her very talented Mommy of course!)

Last but not least was a handmade life... or is it death??... sized coffin that served as the gift spot. Throw a fun party and you're sure to make out like this!

Oh and I have to show you my Halloweeny hair accessory!! Clearly I'm exhausted in this picture... but that's justifiable after dipping 40 caramel apples for 40 screaming, costumed, sugar filled children right?! I had to post this though because I reconnected with a friend I went to high school with on Facebook and she just opened her own Etsy shop, Pinks Parlor. I love the unique style of her pieces and she did a great job putting this one together! I found 4 excuses to wear it during the past week & got a ridiculous number of compliments!


Okay, that's it for this Halloween. I hope you got some good ideas for your parties next year... may as well start planning now!


{Photos by Elemental Image}


Photobucket

Saturday, October 30, 2010

The Week... err weeks... in Bentos

I've been slackin' on the bento posts... so here you go, a few weeks worth all at once:


The first time foods in this stack of pics are extra firm tofu cubes coated in graham cracker crumbs (Elle wasn't a big fan, but Liv LOVES them!  They're perfect for baby snacks!), some goldfish crackers left over from her pool party, apple chips, kiwi, and celery sticks with peanut butter to dip in.
 
You won't want to miss tomorrow's Halloween party post!
Photobucket

Wednesday, October 27, 2010

Homemade Snow Cone Syrups

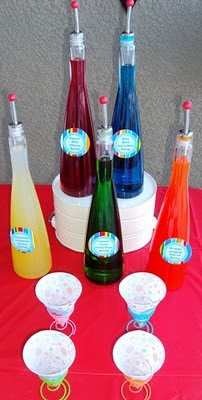
Did you see the snow cone pool party I planned for my Elle's 5th birthday?  The snow cone station was the highlight of the party but the only snow cone syrup the rental company had to sell me was in industrial sized ugly white jugs and cost entirely too much for just one flavor... I definitely had to tackle this project myself!  I started with some neat bottles I picked up at Marshalls.  In their first life, they were expensive bottled water glass bottles.  Next I found pour spouts at the liquor store and had to clip the rubber stopper just a bit so they would fit in the neck of the bottles.  Now for the syrups! 
 
2 cups white sugar
1 cup water
1 envelope Kool Aid
 
In a saucepan, stir together the sugar and water. Bring to a boil, and boil for about 1 minute. Remove from heat, and stir in the drink mix. Allow to cool, and store in a container for pouring.
 
To finish them up I printed and stuck little round labels with the flavor names on the bottles with double sided tape.  These snow cone syrups were so easy to make and looked so pretty I just kept trying out new flavors until we had an entire rainbow!
 
Photobucket


Wednesday, October 20, 2010

Pool Party

Yes, I know the rest of the country has moved on to cool weather celebrations... hay rides, bobbing for apples, and pumpkin pickin' are on my mind too.  But, here in sunny Florida, early October is the time of year we finally, ever so cautiously, emerge from our air conditioned abodes.  The 80+ degree weather makes  it the perfect  time for a pool party!
I kicked Elle's 5th birthday off with beach ball invitations from Oriental Trading Co.  Party details are written on the ball itself, the deflated beach ball goes in a water proof canister, labeled, and mailed.
The guests were greated by a row of custom flip flop party favors (no more guessing allowed for the covered button giveaway).  I'll tell you how to make these easy and inexpensive favors in a coming post.
The highlight of the party was the snow cone machine!  I rented the machine from a local party rental shop

I made the syrups (more on that to come), and picked up the cones, straws with scoops on the end, snow cone stands, and straw dispenser on Amazon.
My Doug made this awesome snow cone sign by cutting a large piece of foam core (available in the framing department at Michael's) into the shape of a snow cone and spraying it with chalkboard spray paint.  The chalk markers make it even more fun!
The round cupcake picks, syrup labels, banner, "lanterns", & craft instructions are all goodies printed from the poolside collection by Paper and Cake All those fun details really pulled it all together!
I just can't get enough of the custom photo cupcake picks! I made a cute set of my Elle holding her breath while wearing her swimming goggles.
In addition to snow cones, pizza, and swimming, the kiddos entertained themselves with playing in the splash pool (I was surprised at how much fun even the kids who could swim in the big pool had just splashing around), diving and sliding on an inflatable slide I got from CSN Stores (review coming in a future post), and making a water yo-yo craft.


Okay, so if you don't live in a climate that is finally just now allowing you to brave the outdoors, you can consider this pool party your last hurrah before we dive into the Fall celebrations (pun intended)!
Photobucket

Friday, October 15, 2010

Custom Party Hat Cupcake Picks

I <3 Etsy shoppers; they're so creative! A couple weeks ago I got an order for a set of the custom party hat cupcake picks I sell in my shop now & convo'd the buyer to ask for the picture of her little birthday cutie.  She sent me a 40 year old picture of her husband & made these awesome cupcakes for his 40th birthday celebration:

Check out these other fun details she put together for his party:

He's a lucky birthday boy to have a wife who would embarrass do something so special for him!
Photobucket

Monday, October 11, 2010

DIY Leaf & Flower Press

A couple years ago I posted about how I "grew up crafty" and the roll my parents played in nurturing my creativity.  I've also posted about a haunted doll house my parents made and the puppet theatre my Dad whipped up for Elle a while back.  I've always appreciated how creative my parents are and it's fun to see my girls sharing in that with them now too....  the gift my Dad made for Elle for her 5th birthday is a great example!  

Elle picks up leaves and flowers all the time... I'm constantly finding leaves in the washing machine and dead flowers in the cup holders of the car.  A flower/leaf press was a perfect gift for her, and my Dad was just the person to make it.  If you want to give it a try, it's pretty easy to do with just a few tools.

Here's what you'll need:
2 pieces of 5/8 inch plywood + a scrap piece
4 3/8 inch carriage bolts
4 large washers
4 smaller washers
4 wing nuts
1/2 inch brad point wood drill bit
sand paper
spray polyurethane
decorative sticker (optional)
Cardboard
wax paper

Cut two pieces of plywood as large as you'd like your press to be, Elle's is 10x10 (you could even ask someone at the hardware store to do this for you).  Place one board on top of the other and drill a hole through both boards, in each corner, about an inch in from the corner (The brad point wood drill bit will help you get your holes straight and lined up.  Putting a scrap piece of board under the two pieces of the press and drill through the press boards and into the scrap piece will keep your boards from splintering).  Next, sand all the edges of your boards, then spray polyurethane all sides of both boards (add your sticker if you want to before you spray the final coat of polyurethane on).   Cut several pieces of cardboard the same size as your boards, then clip off the corners so they can sit inside the press but the holes are left unobstructed.  Now you're ready to put the press together!

Start with the 4 carriage bolts with a large washer on each.  Insert them up through the holes in the bottom board of the press.  Next, layer in the following order until you've put all your leaves and flowers in - cardboard, wax paper, leaves & flowers laid flat and not touching each other (Here's a link to more info on the specifics of how to use a flower press), wax paper, cardboard. After your last piece of cardboard, put the second board through the carriage bolts.  To make your press... well press... put the smaller washers on the bolts, press down on the center of the top board and tighten the wing nuts down.  


(this is the top of the press with it all tightened down)           (this is the under side of the press)


PhotobucketThen you wait...

Related Posts Plugin for WordPress, Blogger...
 
Simply Yours Designs Cute Blogger Templates