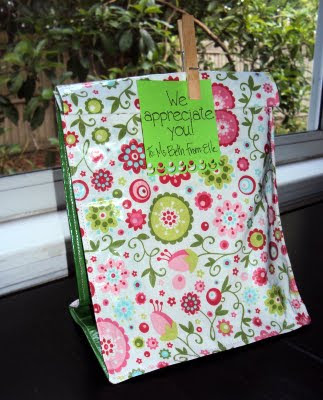
Elle goes to a small Montessori school (I should post about Montessori one of these days… we’re completely in love!). They don’t have a cafeteria, so all the kiddos and I’m assuming teachers, bring their lunches… or bentos in our case… to school. So I thought pretty lunch bags would be a useful little gift to give Elle’s teachers for teacher appreciation week!
I was originally thinking I would make the lunch bags from oilcloth, but I didn’t have enough time to drive up to the fabric shop that I knew would have a good selection. Even if I had made the drive I would’ve had to make them all from the same 2 prints or have lots of scraps since you only need a little fabric for this project. Laminated cotton was the perfect solution! It took 3 and a half yards of this particular laminating material (I bought glossy, not matte), I had a 50% off coupon, and I got to use up some of my favorite scraps!
Confession: I finished the bags Wed. night and was planning to design cute tags and take some nice photos of the bags all lined up Thurs night in time for Elle to give them to her teachers on Friday. Thurs. morning I woke up and realized my plan wouldn’t work because Elle is off of school on Friday! So tags and photos were done while packing Elle’s lunch, feeding the girls breakfast, and getting myself ready for work.
So I know we’re too late for teacher appreciation week, but I think you should make these as an end of the year gift for your kid’s teachers, a “thanks for being so great to work with” gift for a co-worker, a “I just wanted to do something special for you” gift for your kiddo, or “I want to take a pretty lunch to work” gift for yourself! Here’s how I did it:
Cut one strip of fabric for the main part of the bag 29 ½ inches by 8 inches.
Cut two strips for the sides of the bag 12 ¼ inches by 5 inches.
Laminate the 3 pieces of the bag by following the instructions that came with your laminating material Tip: I used paperclips when needed… pins will leave holes in the lamination.
Fold the main fabric in half and make ¼ inch long slits in both sides of the fabric strip 2 ½ inches from the fold.
So when unfolded your main strip of fabric will have four ¼ inch slits 5 inches apart from each other on both sides of the center of the strip.
Sew-in the side panels - With right sides (i.e. laminated sides) together sew one long side of a side panel to the main bag with a quarter inch seem allowance. Stop a quarter inch from the slit you cut. Turn the bag and line up the short side of the side panel between the two slits and continue to sew stopping a quarter inch from the slit. Turn the bag again and sew from the slit back up to the top of the main fabric. Repeat on the other side.
Sew a length of hook and loop tape to the main part of the bag, centered 3 inches from the top. Sew the other side of the tape to the other side of the main part of the bag, centered ½ inch from the top.
Roll down the top of the bag, fasten is with the hook and loop and clothespin a little tag to it.


