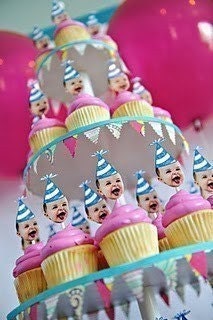
The two biggest lessons I’ve learned in the last 4 years of planning parties for my littles, are 1) don’t make all the food yourself and 2) it’s easier if you don’t host the party at your house. I was pregnant, had a baby, and planned/hosted a welcome to the world party for the baby all just prior to Elle’s 4th birthday. So, I decided to take my own advice and had Elle’s party at a tea room. I loved it! I got to focus on the fun parts like decorating, favors, and games without the not so fun parts – cooking large quantities of food, worrying if there’s enough for everyone, making sure the house is spotless, & ensuring there’s enough space/amenities for everyone to be comfortable.
We set the tone of the party with an adorable invitation featuring Elle’s silhouette, similar to this one by Beyond Design

A little plug here: Ginger at Beyond Design is absolutely wonderful to work with. She’s designed very creative and special invites from scratch for me for several occasions. I’ve recommended her to lots of friends and she delivers flawlessly every single time!
The morning of the party, we came a little early to add the finishing touches to the place settings and do just a bit of decorating. I hung curling ribbon from the chandelier above the table and put the favors at each setting. I made tissue paper flowers with paper leaves that I wrote the guest’s name to use as place cards.


The favors were tiny ceramic tea pot candles for the Moms and purses with gloves (I picked up a few pairs on sale at JC Penney just after Easter) & “pearl” beaded necklaces that Elle and I made for the little partiers. The little white tea pots are from beau-coup. I followed the directions on a package of wax to melt it and dye it pink, filled the pots, inserted a wick, and tied on a favor tag. I used this tutorial to make the simple little purses with bracelet handles.
We started the party off with the Mommies and daughters making hats from wrapping paper, lace tape, and the tissue flower place cards. I don't remember where I saw this idea originally, but I just found this tutorial for you to use if you want to try it!

Then it was time for tea. The girls loved the finger sandwiches, devoured the sweets, and sipped fruity teas with lots of cream and sugar!
After all that prim and proper behavior, we of course made time for dress-up (even for the big girls)!


Wednesday, January 27, 2010
Birthday Tea Party
Posted by
Stacey - Elle Belle
at
6:34 AM
4
comments
![]()
Labels: bracelet purse, candle tea pots, kid purse, parties, tea party, tea party favors, tissue flower placecards, tissue flowers, wrapping paper hats
Friday, January 22, 2010
Google Reader is my friend!
My eyes were opened to a whole new world when I discovered blogs. I follow quite a few blogs (see which ones by clicking on the link in my profile on the right margin). And yes, I do actually read every one of their posts... that's approximately 50 posts a day, all of them combined.
I have a huge file of party ideas I've gathered from blogs. One of my favorite sources for party inspiration, is Design Dazzle. And guess what?! They posted a little blurb about Liv's party on their blog. Awesome right?!
So join in and share the blog love by checking out the Design Dazzle blog!
Posted by
Stacey - Elle Belle
at
11:35 AM
0
comments
![]()
Labels: design dazzle, following blogs, google reader, party ideas, party inspiration
Wednesday, January 20, 2010
Look What I Made!
My 4 yr old loves to collect lots of little things; acorns & marbles are her favorites, but recently she’s started picking up punk pins here and there. Acorns and marbles are easy enough to contain, but of course she wants to pin the pins to something and that can pose a bit of problem… I’m just going to go ahead and admit that I am a Mom who doesn’t let her kid wear the priority mail sticker the postman at the counter gave her, would NEVER allow her to leave the house in last years Halloween costume, and washes the temporary tattoos (it takes serious effort for me to suppress my distaste for those thing every time someone offers her one) off that night at bath time. I’m not about to let her wear a jack-o-lantern pin every day of the week and I certainly don’t want her to poke holes in her outfits. So, when it became clear that the punk pin obsession wasn’t just a passing thing I had to come up with a solution so as not to expose my neurosis. Behold my Godsend, the One Yard Wonders Good Hat Day Hat:

For whatever reason, I think this look is sorta… urban chic/edgy in a kid kinda way. Not only is this little cutie the perfect solution for keeping those punk pins from leaving jinormous holes in outfits or ending up buried in the toy box (we’ve found 3 more pins there since I took this picture), I made it from an old pair of jeans… how’s that for repurposing?!
If you’re going to make this, after you measure your subject’s head according to the instructions in the book, go to the Finny Knits blog and thank God and baby Jesus that she understands how to do the math for figuring out how to cut the top pieces. Read her whole post because she even found a little oops in the pattern, which will save you from having to wonder if you’re crazy when you get to that part.
Oh, and just in case her passion for punk pins ever wanes, I made this flower from Heather Bailey’s tutorial to take their place.

Posted by
Stacey - Elle Belle
at
1:05 PM
1 comments
![]()
Labels: one yard wonders, one yard wonders good hat day hat, sewing
Saturday, January 16, 2010
And the winner is....
Hope!
A big huge happy thank you to everyone who left comments to win the scrunchie bag and to everyone who follows my blog... it's so nice to not feel like I'm just talking to myself :) I love love love hearing from you all!
Random.org drew the winner for me... #9, so that's you Hope.
I'm almost done with a project I'm pretty excited about, I bet you can't guess what book it's from :P I'll post about that in the next couple days.
Posted by
Stacey - Elle Belle
at
1:50 PM
1 comments
![]()
Labels: giveaway winner
Friday, January 15, 2010
Just needed a little boost
I have a confession… my 4 year old was still sitting in a highchair at dinner time. We used to eat at our counter/bar, which only has room for two adults, so we would just pull her up beside us and she’d eat on her tray. When the new little arrived we decided that family dinner was an important time, even for the members of the family that didn’t “eat” yet. So now, we eat at our table… go figure… baby in the highchair and 4 year old in a chair. So what does that have to do with anything?! Aside from the fact that I have to have my sewing accoutrement put away so as to rid the dinner table of sharp objects and designer fabric (no one wants to see Mommy in a fit of panic when my latest pretty is doused with spaghetti sauce), it also gave me an excuse to buy the laminated cotton I’ve been lusting after. Enter the booster seat from the new One Yard Wonders wonder:

This is a pretty simple project; however I did manage to mess up 2 of the corners on my first attempt. If you don’t want to ruin a piece of fabric like I did (seam ripping isn’t really an option since the holes would stay in the fabric/lamination and show), be sure to measure the corners from the edge side of the triangle, and not the folded side… that will hopefully make sense to you when you’re working through the pattern… you all do these projects with me right? Right?? Also, I couldn’t find any reasonably priced buckwheat hulls, so I doubled the width of the foam insert and went with 4 lbs of plastic pellets (the kind they put in beanie babies) instead. It’s comfy and soft and I don’t feel guilty about using plastic instead of an organic material because it is laminated fabric stuffed with foam in the first place after all. My last little tid bit is that after I turned it right side out, and before I stuffed it, I added a handle to one side so that we can carry it with us and she won’t have to sit in those sticky/dirty/when was the last time this thing was cleaned?? booster seats ever again!
Look! I made it through that entire post without whining about having to hand sew the booster closed… I so deserve a gold star!
Posted by
Stacey - Elle Belle
at
4:49 AM
4
comments
![]()
Labels: beanbag booster seat, booster seat, one yard wonders, one yard wonders booster seat, sewing
Tuesday, January 12, 2010
OK, I give!
If I haven't mentioned it before, I live in Florida. I moved here from Illinois more than 10 years ago. Since I grew up in IL, I'm all too familiar with the cold and something I like to refer to as cold weather amnesia. That's where every Winter people like to say "THIS is the coldest Winter EVER!" But seriously, I'm not kidding, no joke, this really is the coldest Winter I've experienced in Florida! Usually we have cold "snaps" here... it gets cold, maybe even a frost for a night or two at the max and then we're back to the weather everyone covets. Not this year! It's been cold for at least two weeks straight. So I finally caved... after washing and re-washing the 4 sets of warm clothing my girls have I decided to make some leg warmers. Our sunny but cool afternoons are perfect for leg warmers paired with a skirt!
I haven't made leg warmers before because I've been happy with the sets I've bought for Winters past from the FateGoddess Etsy shop and also because I don't have a serger, so I steer clear of working with knits. But these couple weeks of cold weather constituted an emergency. So, I found this great tutorial, on the Daisy Designs Shop blog, followed it step by step and whaa laa!
Don't forget to enter the giveaway below... just a couple days left!
Posted by
Stacey - Elle Belle
at
2:17 PM
3
comments
![]()
Labels: leg warmer tutorial, leg warmers, legwarmers, legwarmers from socks, sewing
Friday, January 8, 2010
I made a bag for you: Scrunchie Bag Giveaway!!

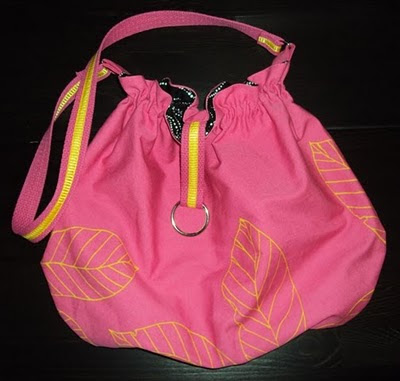
OK so I made the “scrunchie bag” from the One Yard Wonders book. It came together pretty quickly and the pattern was easy to follow. I absolutely love the IKEA décor weight print I used for the outside and the black print on the inside pops up in my projects quite often. 
It’s a nice bag, a great size, and it turned out perfectly, but here’s the thing… the fabric I chose made it just too happy for me. I made a beach bag with this fabric as well and I love it for that purpose, but I’m not cheery enough to incorporate this bag into my day to day wear. Sooooo, if you’re the happy, cheery, friendly type, I’d probably like to be your friend… it’s true, I’m not terribly cheery but I have lots of other redeeming qualities ;)… and not only that, I’d like to give you this bag! Isn’t that friendly of me?!
All you have to do is tell me what your favorite thing in my shop is.
You can also get 2 extra entries for following my blog.
Leave your comment(s) by midnight Jan 15th I’ll announce the winner on the 16th.
Good Luck!
Posted by
Stacey - Elle Belle
at
10:47 AM
41
comments
![]()
Labels: blog giveaway, free bag, one yard wonders, scrunchie bag
Thursday, January 7, 2010
One Yard Wonders - Laptop Sleeve
My Doug got me the One Yard Wonders book for Christmas this year. I couldn’t believe he picked it out all on his own… really… I didn’t even leave the laptop open with the amazon page pulled up, mention it loudly to a friend on the phone, or anything!
I spent a couple hours curled up with it and my sticky flags (something about those colorful little flags make a book look serious) marking all the projects I wanted to do. It should provide plenty of blog material in the weeks to come. Without further ado, the laptop sleeve:

One of the things I love about this book is that even though it’s called One Yard Wonders, several of the projects don’t actually require a full yard of fabric… especially if you’re resourceful. I had that yummy import fabric with the scooters left over from a craft apron I made, but not a full yard of it. So, instead of lining the sleeve in the same fabric as the outside, as the book suggests, I used an orange felt (left over from the glowing pumpkin Halloween bag I made) for the lining. I quilted the scooter fabric, bamboo batting, and felt together with a dark invisible thread. The book has instructions and a pattern to add a cutsie little wiener dog applique to the flap, but I thought the fabric and the quilting made the sleeve as “busy” as I’d like, and decided to omit it. I'm sure the appliqué would have given the flap a finished feel/look, but without it, I’m not in love with the way the flap is. If you decide to make this one for yourself, my suggestion is to at least top stitch the flap… maybe even quilting in the opposite direction as the body of the sleeve would be nice.
Next up is the beach towel bag made with a décor weight IKEA fabric. Stay tuned!
Posted by
Stacey - Elle Belle
at
11:05 AM
5
comments
![]()
Labels: 1 yard wonders, laptop sleeve, one yard wonders, quilted laptop sleeve, sewing


