Saturday, May 15, 2010

Giveaway Winner!

First things first... thank you all for your fabulous ideas for embellishing the stool!  I'll hang on to those and maybe you'll see your idea pop up on a future project if I didn't choose it this time.  There were 25 valid entries (including the entries from when I originally posted the giveaway... who earned 3 entries each) and the random number thingie picked:


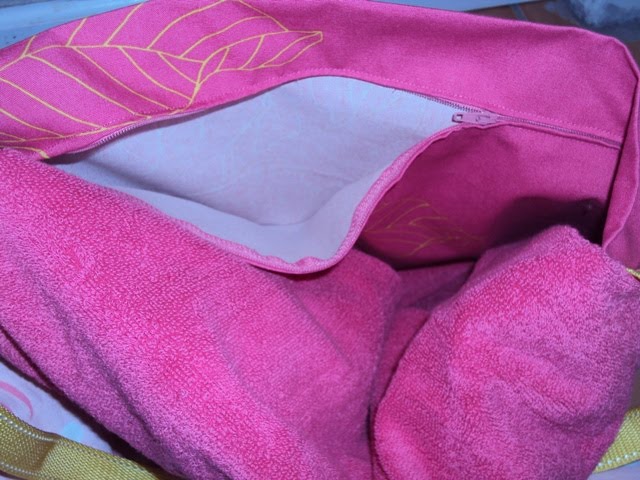
So yea for Kelli of Red Marionette you won the beach towel beach bag!  I'll contact you soon.

Now onto the stool.  It's the kidcraft step and store stool and I love it! A quality stool is an absolute necessity in a house with kiddos & this one in particular fits the bill perfectly. It's pretty light weight and has handles on the sides so Elle can carry it around easily all by herself. It's sturdy too and has already stood up to lots of climbing, sitting, standing, sliding, dragging & wiggling. The only thing it needed was just a bit of embellishment. I'm totally envious of people who have smooth walls because they get to use the product that has revolutionized home decorating... vinyl wall decals.  Our house is about a million years old, so we have bumpy plaster walls.  I really love the concept of decals though, so easy, so quick, and they can give a room, or an item a complete transformation.   I decided decals were the perfect simple embellishment to add just a bit of something special to the stool.  What do you think?


I've only used decals once before, so I don't know if all decals are this easy to apply & nice looking, but I definitely recommend these from Uppercase Living. UL is a direct selling company who pays demonstrators to market and sell their huge selection of vinyl decals.  You can host a party at your house and have a demonstrator come with all kinds of great ideas for decorating your space... neat huh?!  But you don't have to have a party to make a purchase, I purchased these (and another one that you'll get a peak at in a future post) from Gina's website: http://ginac.uppercaseliving.net  You  should definitely take a minute to check out her site, there are some really amazing ideas there!

I think my favorite feature of this stool is the hinged step the opens up for storage! Space is at an absolute premium in our little house (did you notice the rolling under the bed storage boxes in the picture? I try to utilize every little bit of space!). I thought I'd show you what's inside the stool... Elle's hair stuff (minus the bows which are handing on a bow holder in her closet).  I love that little rag bowl that holds her hair ties!  Oh and do you see my secret weapon for getting perfect parts in long locks?  It's up there by the brush... a chopstick!

Friday, May 7, 2010

Giveaway!

So I posted a while ago about the stool pictured above & asked for some suggestions on how I could embellish it in some way… spruce it up. I said I would giveaway a handmade surprise to one of the entrants, but surprises are overrated dontcha think? I’ve decided the anticipation is more fun. So I’m gonna keep the giveaway going and let you know what’s up for grabs - The beach towel bag from the One Yard Wonders book!


I made this bag with a décor weight IKEA print and a pink stripe beach towel. It has a deep zipper pocket for all your beach or pool goodies. If I lived on the beach, I totally would have set up a little scene for you of a lounge chair with a cold drink nestled in the sand next to it and this super cute bag hung over the top of the chair with the towel unfolded just waiting for you to claim it. Alas, I live at least 10 minutes from the beach (I can feel your sympathy from here), so you’ll have to make do with this picture of it hung over the top of my dining room chair.

So here are the new rules… the handful of you who commented on the original post totally rock and you get three entries each. Everyone else:

1) Leave me a comment with your suggestions for how to spruce up the stool (this one is mandatory to be entered for the giveaway).
2) Get a second entry for following my blog.

I’ll draw a random winner from all the entrants on midnight (EST) Thursday 5/14. Then I’ll work a little crafty magic on the stool & post a picture of the completed project when I announce the winner. Good luck!

It's a Carnival!

One of the blogs I follow, Craft Critique, is hosting a Mother's Day Blog Carnival  It's the perfect place to find inspiration for making that special Mother's Day gift.  And, not only that, I'm super excited that my post about the collaged clipboard I made for my Mom last Mother's Day is featured in the carnival!  So head on over there to check out all the awesome ideas!

Oh, and if you need even more inspiration, I also made tub teas last year for Mother's Day and the winged wrap carrier would be an awesome gift for the new or soon-to-be Mommy!

Thursday, May 6, 2010

Sprout Organic Baby Food

I have a confession… I don’t make all of Liv’s baby food from scratch. To make matters worse, I did make Elle’s baby food. I never bought one single jar of baby food for Elle. I knew the day would come when she would look at me with those sweet blue eyes and beg to eat a sugary something that wasn’t even remotely close to anything we should consider “food”, and eventually I would probably cave in. But until that day, I couldn’t think of one excuse for feeding her anything but foods that would help her little body grow into the healthiest and smartest it could be. I just couldn’t justify going from the most perfect food, breast milk, to a jar containing who knows what… seriously have you looked at the ingredients on those things?! So I mashed up whatever organic foods we had in the pantry or fridge, added a little water if needed, and fed her with a smile.

I had full intentions of feeding Liv the same way. About a month ago, I was planning for a trip to IL with Liv & Elle. We were flying and had a 2 hour lay over to contend with in addition to the 4 hours in the air. I was a little concerned about bringing home made food for Liv even though the airlines make concessions to the rules regarding what you can and can’t bring onto a plane for babies (what if they took Liv’s food?! I could just see the headline now “Mom, enraged by confiscation of avocado baby food, slaps airport security”). I was at the grocery store trying to figure out what to get and decided to just check out the baby food, in hopes there would be something I could live with for just 1 feeding. Just then, a ray of sunshine, beaming straight from heaven, burst through the roof of the grocery store and illuminated the Sprout Organic Baby Food. At least that’s how I remember it. I picked up one of the pouches, flipped it over, and nearly cried with joy when I saw the ingredients: Organic Sweet Potatoes, Organic White Beans, Filtered Water, Organic Cinnamon. I bought almost every pouch of food they had on the shelf.

Sprout is a really neat company for lots of reasons (this post is already getting long, so here’s a link to their site so you can check it out for yourself), including why they chose this packaging for their food. I love the packaging almost as much as Liv loves their food! It’s so convenient to just throw it in the diaper bag, it doesn’t take up much room, and if there are any leftovers it zips closed. And the best part is that when people give you a strange look and ask “What’s that?!” you can say “astronaut food” and watch their reaction.

Are you wondering where you can find this amazing baby food? I’m a lucky girl… well actually; Liv is… because we live near a Publix that carries Sprout. But if you don’t have a store close, you can buy it on Amazon:


Okay so that concludes the “you’ve got to try Sprout Organic Baby Foods” portion of this post. I wasn’t planning for that part of this post to be that long… I was planning to post about the bib I designed to carry the Sprout pouches on the go:

Now that I think about it though, maybe I’ll make it into a tutorial for you and its own separate post… yeah, I think I’ll do that instead. Stay tuned!

Product Review

I was just contacted for this amazing opportunity to team up with CSN stores to do a review for them. So I was looking at their websites and little did I know that they have over 200 + sites. They have everything from furniture, to lamps, track lighting,chairs, baby bags, mirrors, seriously they have it all! So what did I pick to review? You'll have to just wait and see... okay I'll give you a hint. It's in some way related to my next post coming up later tonight.

Tuesday, April 27, 2010

How to wear a ring sling


When we're out and about, I see sooooo many Mommies wearing their babies in ring slings the wrong way. I was fortunate to have a friend who was really familiar with how to correctly wear a ring sling show me how it was done. It seems a little daunting at first to get used to the sling and "juggling" the baby, but wearing the baby properly is a completely different, safer, & more comfortable experience than when it's not done right. It's definitely worth the time it takes to practice and learn how to do it properly. If you're not lucky enough to have a friend who is a baby wearing pro, you are lucky enough to "know" a blogger who is... me :) I've put together this list of resources so you can do a bit of homework. You'll be surprised at how quickly you get the hang of it!


I wrote these instructions that I give out with the ring slings I sell. They cover how to get started and each of the carries. It's a good place to start, and if you're giving a sling as a gift, you'll definitely want to print them to include in the package.

Watching someone put on a sling is the next best thing to having someone actually put one on you. The best place to watch... YouTube! I've listed my favorites below. They are really great instructional videos, but I'm considering making some of my own, not because I would do the instructions any better, but because there are some differences if you use an Elle Belle sling instead of the ones shown in the videos. My slings have a lot less fabric than these so threading the sling isn't quite as important/involved as they make it seem in the video. Also, the pleated shoulder on an Elle Belle sling helps it spread across your shoulder, so you don't have to "mess with" the shoulder part to spread it out like she does in the video.


How to thread the sling:


Putting it on:


The tummy to tummy carry - my favorite for infants!:


The kangaroo carry - babies love this one as soon as they have good head control:


The hip carry - as soon as they're old enough to carry on your hip you can use this really comfortable and quick carry. You can use a sling for as long as you're going to carry your child. If your child wants to be carried (even when they're 2 or older) using a sling makes it easier on your back and more comfortable, and this is the carry to use then:


So those are the easiest and the carries I used the most. There are others though, like the back, cradle, and nursing carries that you may want to try out once you get the basic ones down.

Now for the most common mistakes Mommies make. If you're uncomfortable wearing your sling, there's likely something a little off in the way you're wearing it, so check these videos out to see if you can make an adjustment.

The baby is too loose:


Sling is uncomfortable because fabric is bunched across the back:


Sling is uncomfortable because it's against your neck:


Babies legs are straight:


There you have it. I hope that helps you and your baby be comfortable safe and happy with your slings! Leave me a comment if you have any questions or need any help wearing your little.
Happy babywearing!

Monday, April 19, 2010

Muffin Tin Monday

I posted a month or so ago about my latest interest, bordering on obsession, bento box lunches. I was checking out some bento blogs and found Muffin Tin Mom who hosts Muffin Tin Mondays where Moms make lunches for their kiddos centered around a theme and served in muffin tins. I thought it would be a fun bento-ish style lunch I could do on the days I'm home with Elle, so today was our first muffin tin Monday. The theme was left overs.


sorry for the yucky picture... my camera battery was dead and I haven't perfected taking pictures with my precious yet.

She had leftover whole wheat penne sausage pasta & cinnamon raisen toast "grass", pretzel rod & string cheese "stems", leftover peas, tangerine sections, & ranch dip "flowers", and a baby carrot "butterfly". It was a huge hit!

Friday, April 16, 2010

No Chocolate Easter Bunnies Here!

It all started last October. We were completely ill equipped to handle Elle’s first Halloween in which she trick-or-treated (read: amassed ridiculous amounts of sugary garbage that shouldn’t be considered fit for human consumption). I’m not sure why it didn’t occur to me, that despite her previously healthy relationship with candy (we just never had any in the house), having an entire bucket of it in the kitchen was going to be too much for her 4 year old self to resist. Consequently, after every single breakfast, lunch, and dinner we were subjected to “may I please have candy for dessert… please Please PLEASE!?!” We were forced to implement a “no asking for candy” rule… if she asks for candy, she can be sure the answer will be no. However, I don’t want to create a sweet obsessed fiend who sneaks candy into her pockets any time it’s within arms reach, so if she can contain herself for a day or two in a row we’ll offer her sweets of some kind (we get pretty creative… she thinks tic tacs are some of the best candies around). I simply MUST figure out a creative way to get Elle to give up her candy stash next Halloween. I’ve heard ideas like giving them a dollar per pound turned in, donating it to soldiers, or throwing it away little by little each day (I’d really prefer not to resort to trickery). Let me know if you’ve heard/tried something that worked. So with Easter quickly approaching, all I could think about was how much I HATE CANDY HOLIDAYS!!!

I decided to be bold, and forgo candy all together in Elle’s Easter basket. I knew I was going to have to come up with something good if I stood a chance of contending with the “my friends all got chocolate Easter bunnies… where’s mine?!” line of questioning. I had been mulling it around for a few days when one of my most favorite blogs, Ikatbag, posted a new pattern she created for… you guessed it… a stuffed chicken that lays eggs that hatch baby chicks!! What?? You didn’t guess that? I stopped just short of jumping up and down and squealing with delight when I saw it. It was so perfect! Elle’s favorite subjects to pretend to be are always animals, and often chickens, she had just been clucking and “laying eggs” on the couch the night before.

This is a picture I was playing with using the color splash app on my new "precious" a.k.a. iPhone:

This was my first attempt at making a stuffie. I was a little hesitant at first, especially because LiEr of Ikatbag is an amazing seamstress, she’s the real deal, and I figured nothing I made, even if it was her pattern, would turn out nearly as well as hers. But I managed to find some quiet time alone with my sewing machine and jumped right in. I couldn’t be happier with how Petunia turned out! She’s just the right size for cuddling, her chickadees sparked a faint memory of my Mom teaching me the French knot when I was young, and the look on Elle’s face when she realized there were chicks in the eggs Petunia laid… oh it was so sweet… not one single time did she even mention candy or chocolate Easter bunnies… mission accomplished!

Wednesday, April 7, 2010

Crinkle Corner Tag Blanket Tutorial


If you’re not already familiar, I’d like to introduce you to the best and hottest baby gift, tag blankets! There’s something about those little loopies that babies love! You can find blankets and toys with ribbon loops made by the Taggie Company in stores all over these days. Taggie patented the whole ribbon loop thing, and they’ll getcha if you attempt to make & sell a tag blanket, so don’t do that. But, you can make a tag blanket for your own little or to give as a gift. Handmade tag blankets are my favorite baby shower gift to give! The blankets I make incorporate some unique materials so they’re even more of a tactile experience than the mass manufactured kind. So here you have it, my tutorial for a crinkle corner tag blanket:

1)Cut two 14 inch squares of fabric. Minky and Satin is a dreamy combination that makes for blankets with the ultimate cuddle factor! You could use other fabrics like cotton, flannel, or fleece, but once you try Minky and Satin there’s no going back!
2)Cut 12 ribbons that coordinate with your fabric. I use grosgrain, satin, sheer, & velvet ribbons to create a sensory experience. We want the baby to explore the blanket, so mix it up and keep it interesting. I also like some of the ribbon loops to be short & some long, so I don’t cut them each the same length. I do however; make sure they’re not longer than 5 inches because I don’t want the baby to get tangled up in them.

3)Fold the ribbons in half, and pin them, raw edges in line with the raw edges of the fabric, to the right side of the Minky. Pin them so that the ribbons are spaced 3 ½ inches apart.

4)Sew the ribbons to the Minky using a ¼ inch seem allowance.
5)Place the satin on top of the Minky, right sides together (the ribbon loops will be sandwiched between the Minky and satin) and pin.
6)Now for the fun part, the crinkle! Add another dimension to your blanket and give it that crunchy feel and sound. You can find some stuff being sold as “crinkle material” online, which is what I use just because I have experience with it, but you can use cellophane too… I’ve even seen someone use a candy wrapper. Cut your crinkle into an 8 inch square, fold it in half to make a triangle and pin it on top of the satin in one corner.

7)Sew a ½ inch seem all around the blanket leaving a space between two ribbons to turn through. Be sure you catch both sides of your crinkle corner.

8)Finish the seems. This is an important step because it will prevent the ribbons & satin from fraying and give it that extra strength to stand up to all the play it’s sure to get. If you have a serger, lucky you, definitely use that. I use an overcast stitch on my sewing machine that’s specifically for finishing seems… but you could use a zig zag stitch if you don’t have that.
9)Turn the blanket right sides out and lightly press. CAUTION: You could scorch the satin and melt the Minky, so don’t use a hot setting on your iron and go quickly over the crinkle or it could melt too.

10)Pin the opening closed. Using a thread the same color as the Minky, top stitch all around the blanket, being sure to close up the opening.


Okay now go be the hit of a baby shower near you!


This post linked to from:
giveaways

Monday, April 5, 2010

Link Parties are Fun!

Check out some of my favorite link parties and post links to the parties you host!  Please follow these rules:
  • Link to your blog's home page, not a specific post
  • Only post links to parties you host every week
  • Post under the correct day's link listing
  • If you post link parties on your blog, add my Your Way Wednesday button to your listing. You can find the html for it in the right side bar of my blog. 
*I will delete any links not following the 4 rules outlined above


Related Posts Plugin for WordPress, Blogger...
 
Simply Yours Designs Cute Blogger Templates