This dessert table I put together for Liv's
One Year Old in a Flash birthday party is the first one I’ve ever done… I had so much fun with it, but was totally surprised at how much planning and preparation it took! From top to bottom here’s all the nitty gritty. I started by finding some fabric in just the right color teal. I hemmed the edges to make the tablecloth and took it into a Sherwin Williams store. They popped it into a little machine they have & told me which of their colors was the closest match… and it was a really really close match! I bought a $4 sample size jug of paint in that color (Tempo Teal if you’re curious). I loved using Sherwin Williams’ color match system not only because I now had the perfect color paint to match my scheme, but also because I grabbed a few Tempo Teal paint chips and picked out the right shade of pink to coordinate with it and now I had pink and teal paint chips to carry around with me to match any of the party stuff I purchased to. And if that weren’t cool enough, Sherwin Williams has a pallet for Photoshop and a color match app you can use on your iPhone… I’ll get into the Photoshop thing when I do the post about
Ink Bloom.
Okay, so once I had decided on the exact colors and made the tablecloth, I needed a backdrop. I’ve looked through about a billion photos of dessert tables and if I had to pick one thing that separates the good from the not as good, it would be the backdrop. The food and things on the table are the stars of this production, but you have to give them a stage! I cut lengths of trim at the hardware store, mitered the corners, screwed them together with L brackets, and painted it with the Sherwin Williams sample paint. The morning of the party, I stapled white paper to the back of the frame (it’s the paper that comes on a roll that teachers use on the bulletin boards they decorate for their classrooms) and stuck the whole thing to the wall with 3M hook and loop. It took me a bit of research to track down bigger than average balloons, but Rick at
Balloon Productions came through for me and supplied me with the 17” round balloons. I measured and stuck 3M hooks (3M is my secret weapon for nearly everything!) to the floor spaced equally apart, then tied the balloons to the hooks.

Serving pieces next. I found the flat rectangle dishes at Marshalls for pretty cheap. The pink risers are one pink shirt box that I had in my gift wrapping stash forever. One side is the top of the box, the other the bottom of the box, I just flipped them over and cut Styrofoam to fit in the inside so it would have the stability it needed to hold the cake domes and popcorn boxes. The cake domes were definitely my favorite find! I picked up the domes, the bases (I’m not even sure those bases actually go with the domes… they look like those plates with little feet that you melt a big pillar candle on) and a pair of teal candle sticks at the Goodwill store. They were $1.19 ea. and $.50 for the candle sticks. My Doug found some super grippy industrial tape at the hardware store and we just taped the candlesticks to the dome bases. I had those two big glasses from centerpieces from a friend’s wedding & I’ve had the tiered stand for years… I definitely recommend investing in one; you’ll be surprised at how often you’ll use it.

The little decorative touches and printed goods add so much to a table! I made the little bunting for the tiered stand by cutting tiny triangles out of fabric with pinking shears, hot gluing them to a ribbon, and attached the bunting to the stand with glue dots. I made liners for the rectangle dishes and the cake domes in the exact colors of the party by using
Ink Bloom printable designs and the Sherwin William’s Photoshop color pallet. I printed the papers at home, cut them the right size for the dishes, and had them laminated at an office supply store.
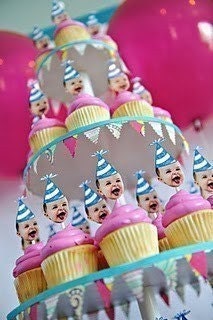
Beyond Designs designed the water bottle labels. I pulled the labels off some water bottles, printed the fancy labels, put clear packing tape over them to give them a finished look & shine, cut them out and stuck them on the bottles. The popcorn boxes are just a repeat of the little saying that was on the invitation (“My oh my how the time does fly! How could one year have already gone by?”), in the same font as was used in the invitation, printed on cardstock. I shrunk down a popcorn box template so that I could fit two to a page, printed the template on the back of the paper printed with the saying, cut them out and assembled the boxes with tape and a line of hot glue. My Dad is a graphic designer and I always coerce him into helping me out with my latest projects (love ya Dad!). He added the party hat graphic from the invitation to a picture of my Liv with pink icing on her face, I printed it off, cut the heads out of photo paper & hot glued them to lollipop sticks to use for the cupcake picks. You can buy this design featuring your little birthday cutie so you can make these picks yourself in
my Etsy shop. Little doodle frames with the name of the food added a finishing touch to the cake domes and glasses.
Last, but certainly not least, the food! I made the
marshmallows,
chocolate dipped Oreos, and white chocolate coated popcorn (read about those by clicking on the names). I ordered the adorable rose flavored pink macarons from
Sparkles Kitchen on Etsy, and a local bakery made the cupcakes. I wanted the cupcakes to look a little more “special” than the typical birthday party cupcakes, so I asked them to ice them with a plain round tip instead of the star tip that makes the “ruffly” edges you usually see on cupcake icing. The wrappers on Hershey’s Bliss raspberry chocolates were just the right shade of pink, and dumping those in the glasses was easy enough… I just made sure that none of the silver from the inside of the wrapper was showing… I’m just crazy enough to stand there flipping them all over!
There are a couple small things I would change about the table… nothing that I’ll share though ;)… but for the most part I’m really happy with the way it turned out & it got raves from the guests! I’m already looking forward to giving the whole dessert table thing another try, I’m pretty sure it’ll be a part of all my future parties!